Celestial Roots Celestial Roots

  • Home
  • Elder Tonic
  • Bushfire Cider
  • healthhub
  • RECIPES AND INFO
  • About Tom
  • Testimonials
  • contact
  • Home
  • Elder Tonic
  • Bushfire Cider
  • healthhub
  • RECIPES AND INFO
  • About Tom
  • Testimonials
  • contact
Tweet

Celestial Roots

Replenishing Body and Soul

Real Men Eat Gluten Free Quiche

image


I love quiche. They say real men don’t eat it, and will this gluten free quiche place my manhood even further in question?  Well, you could always ask my wife about that, but meanwhile, this gluten free quiche base really works.


Gluten free quiche base


100 - 125 g butter

1 egg

½ cup buckwheat flour

¼ cup rice flour

¼ cup quinoa flour

¼ cup almond meal

1 tbsp + 1 tsp of water

½ tsp Himalayan (or other good) salt


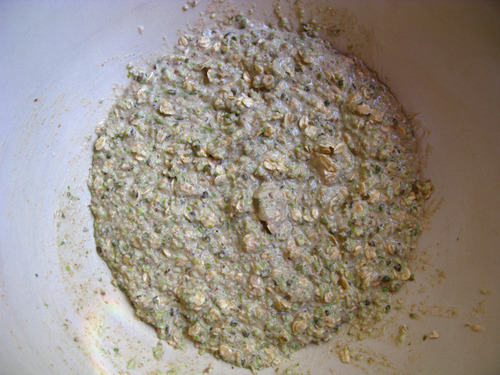
Cut butter into pieces, place in a food processor with the salt, and pulse several times until blended. Scrape the mix down the sides of the processor bowl. Add the almond meal, the rice and quinoa flours, the egg, and the water, and pulse until blended. Scrape the mix down the bowl, then add the buckwheat flour, and pulse again until blended.

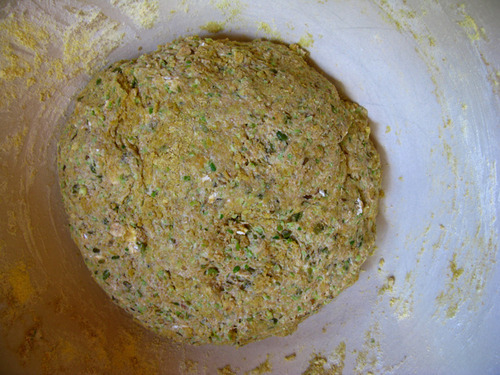
Put about 2 tbsp of buckwheat flour in a bowl, then add the dough mix from the processor bowl. Work into a soft but coherent ball of dough, adding a little more buckwheat flour as necessary. Place the ball of dough in a glass bowl with a lid, then place in the freezer for 10-15 minutes. Preheat an oven to 185° C.

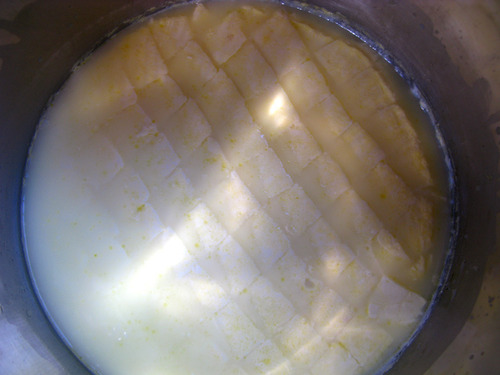
Oil a 9 inch flan or pie dish, then place the dough ball in the centre. Working outwards, push the dough evenly to the edges, building up a crust thick enough to ensure a reasonably thin but solid base. Prick the bottom of the dough case with a fork, and blind bake for 10 minutes at 185° C.

You quiche base is now ready to fill and use. 3 eggs and a cup each of cream and grated cheese (of your choice) will be enough with vegetables or meat to fill this quiche.

For this quiche, lay half the grated cheese on the  blind baked case, then chopped spinach. Mix the eggs and cream, add a little nutmeg and salt and pepper, pour half over the spinach. Sprinkle most of the cheese, then add the last of the spinach, pour over the remaining egg mix, top with the last of the cheese, crack some pepper over the top, then back at 190 for 30 mins max, or until golden.

And as for all those quiche haters out there? Well, I would say “bite me”, but that would be rude, and it’s doubtful you could keep up with me.

Love, peace, and food freedom!

https://www.facebook.com/celestialroots

http://www.celestialroots.com/

Magic is the Intelligence of Love

Posted 554 weeks ago

Tongbaechu-Kimchi - From Korea With Love

image


Tongbaechu-kimchi


There are many kinds of kimchi, but when Korean people say “kimchi”, this is the one they mean. The wombok (napa) cabbages are fermented in quarters, and a thick paste is made with sweet glutinous rice porridge, thinly cut vegetables, spices and Korean chilli flakes (gochugaru). The cabbage quarters are salted and softened, rinsed, covered with the paste, and then wrapped around themselves. These little parcels are then layered and pressed into a crock with whatever remains of the paste being used to fill any gaps. The outside leaves of the cabbage are placed on top, and the kimchi is fermented for 5 days or so before being transferred to cold storage. There is a lot of hands on work here, so making traditional Tongbaechu-kimchi presents the perfect opportunity to put the energy of love into our food. Korean people often eat some of their kimchi immediately with a simple salad dressing, or after only 1 or 2 days have passed.


Ingredients


3 large, or 4 meduim wombok cabbages

¾ to 1 cup Himalayan or other good salt

2 medium carrots

2 small daikons

2 small turnip radishes

1 ½ cups garlic cloves

1 cup ginger root

4 large or 8 regular spring onions

1 large onion

1 cup fish sauce

2 cups of gochugaru (Korean chilli flakes)

4 cups water

4 tbsp raw sugar

4 tbsp glutinous rice flour


This will take some time, we will need some big bowls, and some way of draining a lot of cabbage. I used a colander and a wire rack over two different pots. First, we get the cabbage ready.


The cabbage


Remove the outer leaves of the cabbage, and put these aside. Examine the cabbage for any insect or grub holes, cut these out until any critter and damaged foliage are removed. Cut the stalk end neat with the rounded base of the cabbage, and place a 5 cm cut up the middle of the base of the cabbage. Possibly using the knife for initial leverage, we work our fingers into the cut and gently pull the cabbage into two halves. This prevents us shredding the delicate inner leaves. Place a similar slit in the base of each half, but don’t separate them into quarters just yet. Rinse the cabbage halves well in water, and place them all in one very big, or two big bowls.

image

Take a bit of salt and begin rubbing it all over the leaves while the cabbage is still wet. Lift each leaf and work a little salt into each one, using a little more toward the base where the leaves are thickest. Try not to break off any leaves. As they are done, they need to be laid or stood on end in a large tray(s) or bowl(s). If laying flat, they need turning, if stood on end they need upending, both regularly through the two hours the cabbage will sit with the salt on. Water will collect in the tray or bowl, this may be spooned over the cabbage halves, and they may be dunked in the brine occasionally. Whatever works best depending on the set up we have.

After two hours, split the halves into quarters using the slit we put in earlier, rinse them well to remove the salt and any remaining dirt. Cut the bulk of the core away, leaving enough for the leaves to remain attached, then place them on a rack or in a colander to drain. Once mostly dry, our cabbages are ready to use.

image


The porridge


In a small pot, add the rice flour, then stir in the water to make a smooth liquid. Turn on the heat to medium, and cook for 10 minutes, until the liquid bubbles and thickens to a smooth porridge. Add the raw sugar, then stir and cook for another minute or so. Turn of the heat, and let this cool completely before adding to the paste. Do this as soon as the cabbages have begun the two hour soaking.


The vegetables


Cut the carrots and radishes into fine juliennes, or matchsticks. Cut the spring onion (whites and greens) thinly on the diagonal, then set aside. At all times during the handling of the ingredients, I like to maintain a focus of love and healing energy. In the photo below, as an extension of this, a balanced energy has been added to the mix during a meditative yin/yang arrangement of the carrot and radish juliennes.

image


The paste


Take the garlic, ginger and onion and either put in a food processor, or finely chop by hand. In a large bowl, add the fish sauce, the finely chopped spice mix, and the chilli flakes, then stir. Stir in the cooled porridge.

image

This is starting to look pretty good, isn’t it?

image

Stir in the vegetables until a thick and lumpy paste is formed. We are now ready to lay each wombok quarter into the paste bowl one by one, and to work in the paste.

image

Make sure the spaces between the leaves are well covered. Work the paste in there, and massage it into the outsides, especially the lower part where the leaves are thickest. This is a great time to put love energy into the food. We are lovingly opening the leaves and pasting them with goodness and taste, good energy is easily transferred in operations like this. Love your kimchi!

image

Once well coated, fold the quarter in on itself to make a little parcel. They are very soft now, this will be easy to do.

image

Pack each quarter into a large ceramic crock, trying not to leave any airspace. Pack bits of paste or shed leaves into any gaps, and continue until the crock is packed. Spoon any remaining paste over the top.

image

Take the outside leaves we reserved at the start, wash them very well, and trim any dead or dry matter. Layer these on top of the kimchi, pushing down as you go to express any air that may be trapped. Once you have layered all the leaves, put the lid on the crock and let ferment for 3 – 5 days. After 5 days, eat some fresh, and place the rest in glass jars for cold storage.

image

This is food that should be eaten fresh, though it will store well in the fridge. Refrigeration slows down fermentation, but it does not stop it. The longer the kimchi is in the fridge, the sourer the taste will become.

This recipe draws inspiration from many traditional sources, with a little tweaking of my own. The most influential source was the excellent Maangchi. Visit her website here for authentic Korean recipes

https://www.facebook.com/celestialroots

http://www.celestialroots.com/

magic is the intelligence of love

Posted 556 weeks ago

Pesto from beet greens and spinach

image


Bartering, skill exchanging, and the gift economy may seem like modern, hippy-flavoured ideas to many in mainstream society, but this is the way humanity used to function before money was invented. Money is a symbol we use for the energy behind the fair exchange of human goods and services, but in many ways the energy is forgotten, and the symbol has become the reality for most of us. The management of the symbol we call money of course is big business, and human greed being what it is, the value of hard work and fair exchange is all but forgotten in the scramble for personal gain, and in the knock-on effects of the debt-slavery mind set the world has entered into. There is nothing inherently wrong with money – it is merely that we have allowed what began as a convenience to become a prison of sorts, where the energy that money symbolises is blocked from its natural flow.

image

In our family, we are always happy to exchange goods or services, as well as using the symbol of money. We recently visited Clearwater Gardens Farm, at the gateway to what is locally known as “The Promised Land”, an organic family-run farm in one of the most beautiful parts of this country. We arrived with fermented vegetables, two kinds of ginger/turmeric beer, and some fermented lemon barley water. We left with more vegetables than most of us see in one place at any time, and some jars of fermented vegetables. I will ferment the bulk of the produce, and when it is ready, we’ll share the finished product back with the farm, and with others. The photo above shows some of the vegetables, but not all of them.

We also like to use everything, out of respect for the earth, and it just seems like the right and sensible thing to do. Carrot tops and other greens went in for vegetable stocks for the freezer. Beetroot greens, and some spinach were earmarked for pesto. Which is why we are here - lets make pesto!

image

Beet green and spinach pesto


4 cups beetroot greens

2 cups of wilted spinach greens

4 – 6 garlic cloves, roasted

100 g pine nuts, roasted

50 g raw cashew nuts

150 gm parmesan cheese, grated

100 ml extra virgin olive oil

1 tsp salt (or to taste)

Fresh ground black pepper to taste

1 - 2 tbsp lemon juice


Wash the greens, and wilt the spinach. I had vegetable stock going on the stove, so I wilted mine in the stock pot. Roast the pine nuts and garlic in a tray in the oven on a medium heat until the skin will peel easily from the garlic, and the nuts are a very light brown. Add all the ingredients except the oil into a food processor, blend for a short time, them continue to blend as the oil is added slowly.

image

image


And that’s all there is to it.


Why do we wilt the spinach?

image


Spinach is high in oxalic acid, which may lead to kidney stones. Some research also indicates that spinach inhibits bodily uptake of iodine. Both of these issues are addressed by a brief wilting or par boiling of the leaves.

image

Freeze some, and enjoy the rest fresh within three days.

https://www.facebook.com/celestialroots

Magic is the Intelligence of Love


Posted 556 weeks ago

Spiced Sourdough Pumpkin Scones

 
Spiced Sourdough Pumpkin Scones
 
 
On a rainy day, when kids aren’t at school, it always helps to bake something - get a fire going, put the scones in the oven, play a little chess, and maybe even get a child to do some tidying up while waiting for the light and fluffy goodness encased in a soft but crunchy crust!
 
Pumpkin Scones, with a touch of spice, all natural, and even the baking powder is aluminium free! These scones are delicious, so light and fluffy, and so, so tasty. You really must make these.
 
2 cups mashed pumpkin
2 cups whole spelt flour
1 cup buckwheat flour
1 cup corn flour
1 cup sourdough starter
2/3 cup brown sugar 75 gm butter
1 tbsp molasses
1 tsp baking powder
1 tsp baking soda
1 tsp salt
1 tsp vanilla essence
1 tsp coriander, cinnamon, nutmeg combined
 
To 2 cups of cooled mashed pumpkin, add the sourdough starter, the vanilla, the molasses, and the spices. Put aside. Sift the flours, sugar, salt and powders into a bowl. Cut the butter into small pieces, and rub into the flour mix until it somewhat resembles breadcrumbs. Mix in the mashed pumpkin, do not mix too much, just enough to fully wet the dry ingredients. The batter will be stiff, but liquid. Unlike some scones where the dough is formed into a cake and cut, these scones are smoothed onto an oiled baking tray, or into an oiled muffin tin. With the scones on the tray, put the tray in the freezer, and turn the oven on to 210 deg C (400-ish F). When the oven has reached the desired temperature, cook the scones for 20-25 minutes.
Cool briefly on a wire rack, then serve with butter, cream and jam.
Posted 556 weeks ago

Adzuki Bean and Pumpkin Stew - Japanese Kidney Medicine!

image

Adzuki Bean and Pumpkin Stew with Black Sesame and Lime Rice
 
This is a very healthy Japanese style stew that tonifies the kidneys, adrenals and pancreas, regulates blood sugar, dispels heat and toxins from the body, and strengthens digestive function. Red beans and rice are a revered combination in Africa, the Caribbean, Central America and Asia because together they provide a complete protein source. In unsprouted beans, protein, even when combined with rice, is not quite as good as we would like. The idea of combining the beans and rice is that each possess an amino acid the other lacks (and which we cannot manufacture), thus in combination we have a complete protein, albeit in lower amounts than is found in meat sources. The idea of sprouting the beans is that the quality and availability of this protein is increased. In kidney beans for example, available protein is increased by about 43% with sprouting. Phytates, which are plant defence chemicals, are high in beans, but sprouting reduces their levels by a similar percentage. Phytates, as well as being an irritant to us, bind essential minerals and so make them largely unavailable. Unless we sprout – the bioavailability of all minerals and vitamins is much increased in the sprouted bean. This is a very easy to digest meal, and the flavours are subtle, yet enticing.
 
2 cups sprouted adzuki beans*
3 cups diced pumpkin
1 onion, diced
3 garlic cloves, diced
Thumb sized piece of turmeric, diced
Thumb sized piece of ginger, diced
Good handful of chopped kale
1 tsp black sesame seeds
Freshly cracked black pepper
¼ cup coconut oil
1 tsp sesame oil
2 tbsp sake
2 tbsp dried wakame flakes
1 tsp honey
Lime juice
 
Rinse sprouted adzuki beans, and bring to a slow boil in a pot of water that covers them by a thumb length. Add the wakame. Keep on the heat for 20 minutes or so. Meanwhile, in a separate pot, add the coconut and sesame oil, and add (in this order) the onion, garlic, turmeric and ginger, giving each a minute or so of gentle frying while stirring every now and then. Add the pumpkin, then the sesame seeds, and keep stirring for about 5 minutes. Add the cracked pepper, salt, and sake, stir briefly, then skim any scum off the beans and add them, water and all. Cook gently for 30 minutes, or until thickened. Five minutes before serving add the kale. Squeeze some lime juice in, mix, and serve.
 
* Sprouting adzuki beans: Rinse an amount of beans, then fill a jar to about a third with beans, then fill to ¾ with pure water. Leave to soak for min 8 hours, maximum 18 hours. Drain, and then put back in the jar. The jar will need to be laid on its side in the dark, so a piece of cloth needs to be secured across the entrance. Lay the jar on its side in the dark, and every 8 hours or so, rinse and drain quickly, then replace. The beans will start to sprout anywhere from 12 to 24 hours after this. Once they sprout, they need another day or two until the tails are almost as long as the beans. This is when they are ready.
 
Black Sesame and Lime Rice
 
2 cups brown rice
2 tbsp sushi rice seasoning
1 tbsp black sesame seeds
Lime juice
 
Rinse the rice several times, then drain off the water. Place the rice in a dry pot and cook on medium, stirring, until the water is evaporated. Continue to dry-fry the rice until there is a nutty aroma. Add water to the rice so it is one finger joint above the level of the rice and cover the pot tightly. Turn the heat up, and as soon as the water boils, turn the heat down as low as it will go. The rice will take 20-25 minutes. When done, stir in the sushi rice seasoning, the sesame seeds, and the lime juice. Place rice in a ramekin or similar, push tight, then invert on the plate.
Serve with pumpkin scones and wedges of lime. Salt, cracked pepper, and soy sauce should also be available on the table.
 
Spiced Sourdough Pumpkin Scones
http://celestialroots.tumblr.com/post/96943864348/spiced-sourdough-pumpkin-scones
Posted 556 weeks ago

Gluten free banana and prune pancakes

image

Gluten free banana and prune pancakes


These pancakes are light yet hearty, and very tasty. They are true gluten free, and the recipe allows adjustment for vegan and lactose intolerant folk. Everyone can enjoy these healthy treats, most of all our kids, and no one would ever know they are gluten free.


1 cup buckwheat flour

1 cup brown rice flour

2 eggs

1 ½ cups of milk or buttermilk (almond milk for vegan or lactose intolerant)

1 big or 2 small bananas, mashed

¼ cup coconut sugar

3 tsp baking powder

¼ tsp salt

1 tsp raw honey

4  prunes, finely chopped

1 tsp cinnamon

Butter or coconut oil for frying


Mix the flour, baking powder, coconut sugar, cinnamon and salt together in a bowl. Mash up the banana, add the prunes, 1 tsp of honey and ½ a cup of milk and blend to a lumpy paste. Combine with the dry ingredients, then whisk the eggs before stirring into the batter.

Cook on a low to medium heat using either butter or coconut oil. These are wet and soft when turned for the first time, make sure your spatula is clean (it’ll need wiping every  batch). A good technique is to slip the spatula a little over halfway under the pancake, then lift it up and over with a forward motion. Make small pancakes, the big ones are a pain in the proverbial to turn.

These pancakes are light yet filling and very sweet as is. There is always room for a little decadence though, so we added butter, honey and lemon juice to ours.

https://www.facebook.com/celestialroots

http://www.celestialroots.com/

Magic is the Intelligence of Love

Posted 556 weeks ago

Fish Head Soup

“Good broth will resurrect the dead” – South American proverb.

image


Another South American proverb goes – “Fish broth will cure anything”. And one last quote, this time from Barnes and Barnes – “Fish heads, fish heads, roly poly fish heads. Fish heads, fish heads, eat them up yum!” Why should we make stocks and broths from scratch? Isn’t it easier to get one of those packets or cartons from the supermarket? It certainly is easier, they don’t taste too bad, so is the hard way worth all the extra effort?

image

 This a recipe for fish head soup from a fish broth, so obviously my answer will be “yes, it is worth the effort”. Here are a few reasons why. A good fish head soup is rich in gelatin. Gelatin, as well as being useful for treating some specific complaints such as ulcers, diabetes or muscle wasting disorders, is a hydrophilic colloid which attracts and holds digestive juices to food in our gut. Fish head soup is rich in calcium and other minerals, and we add vinegar initially to assist with the extraction of bone minerals. Fish heads with the thyroid glands intact give us iodine and thyroid strengthening substances derived from the glands. Broths also offer us a world of taste without the need to rely on neurotoxins like MSG. Artificial stocks and flavourings are not only toxic, but their primary function is to trick us into believing that the bland and nutritionally dead foods they adorn are actually health-giving.

So, get stuck into some roly poly fish heads – your body will thank you. Without further ado …


Fish Head Soup with Kumara and Turmeric

3 large fish heads

2 carrots (plus tops)

2 celery sticks (plus tops)

1 large onion

1 tsp peppercorns

1 tsp fennel seeds

2 bay leaves

Dash of apple cider vinegar

2 tsp salt

1 kumara (purple sweet potato)

2 spring onions

2 inches grated daikon root

1 good strip of wakame, cut into small pieces

Thumb-sized piece of turmeric root, grated

Coconut oil

2 star anise seeds

½ tsp cumin seeds

2 cloves of garlic

Thai coriander to garnish

image


In a slow cooker, place the fish heads, one roughly chopped carrot and both carrot tops, one roughly cut stick of celery and both tops (don’t worry overly if you don’t have the tops), the onion, roughly chopped, the peppercorns, fennel seeds, and bay leaves, then add water to cover the heads. Add the dash of vinegar and cook on the lowest heat possible for 24 hours, adding the salt at the 8 – 12 hour mark.

image


Take a heavy wooden spoon and break the fish heads up as much as you can in the pot. Pour the broth into a pot, straining out the bone and vegetables. Place the pot with the strained broth on a low heat, and add the diced kumara, and one diced carrot, letting the broth cook very gently for 20 minutes or so. Add one finely sliced celery stick, 2 finely chopped spring onions, and the grated daikon. Cook gently for another 10 minutes, then add the chopped wakame. Meanwhile take the star anise and cumin seeds and grind them in a mortar and pestle. Gently fry the grated turmeric in the coconut oil in a small pan. When it is softened, and the oil coloured, add the spices, a good amount of ground black pepper and the garlic. Fry gently, stirring continuously for a minute, then pour the contents of the pan into the soup pot. Cut Thai coriander and sprinkle into each bowl as a garnish.

Turmeric is one of best medicine foods going. Curcumin, the active principle, is fat soluble, so we fry turmeric in oil for maximum benefit. Black pepper, as well as being a great medicine food in it’s own right, is a catalyst for the uptake of curcumin by our body. One study indicates it may help us absorb 2000% more curcumin than if we take turmeric on its own. Thai coriander is a good nerve tonic, and unlike conventional coriander, this herb retains its flavour on drying. Kumara is high in anti-oxidants, and has anti-cancer and anti-coagulant properties. Like both turmeric and pepper, it is also anti-inflammatory. Kumara is also high in phytoestrogens, so may be helpful as part of a natural hormone replacement therapy protocol. It may also assist with menstrual problems, and with osteoporosis.

“The kumara has no need to boast of its sweetness” - Māori proverb

https://www.facebook.com/celestialroots

http://www.celestialroots.com/

Posted 557 weeks ago

Sprouted Mung Bean Sourdough Bread

image

Sprouted Mung Bean Sourdough Bread

This bread is a good meeting point between traditional sourdough bread and sprouted Essene bread. Sprouted breads are often problematic – they can crumble, they can be a bit heavy and gluggy, or they can be hard, heavy and/or tasteless. Not always of course - a good sprouted bread is delicious, but here we are using not the sprout of a grain as the primary ingredient, but the sprout of a bean.

In India, mung beans are the first solid food given to infants because they are easily assimilated, and offer a host of nutritional and systemic benefits. Mung beans are high in vitamins K, C, and B, and many essential minerals, and are indicated as healing, helping foods for conditions as diverse as diabetes, dry or aging skin, constipation, heart disease and cancer. Mung beans are low in oligosaccharides, the compounds responsible for flatulence and difficulty with digestion, and sprouting reduces these even more. Sprouting also reduces anti-nutrients which can bind essential nutrients (making them largely unavailable), and which can be an irritant to us. This bread is cooked on a very low heat, preserving the water soluble vitamins as well as the fat soluble ones, and retaining the enzymes and other beneficial metabolites of the sprouting process.

For a gluten free version, substitute another flour for the spelt. Add extra buckwheat or chickpea flour, or try rice flour, corn flour, or whatever you have. While oats don’t contain gluten, they do contain a protein that is similar to gluten that some people are sensitive too. Oats are often processed on machinery that processes gluten grains, so contamination is also a possibility. Try substituting a mixture of a seeds (pumpkin, sunflower, etc), perhaps with a bit of corn flour or polenta. For optimal health, all corn should be organic (to ensure non-GMO status).

image

Ingredients

350 g sprouted mung beans*

2 cups of slow fermented sourdough starter**

1 cup of oats

1 cup buckwheat flour

1 cup of chick pea (garbanzo) flour

1 cup whole spelt flour

2 tbsp olive oil

1 tsp salt

The mung beans need to be sprouted until the roots are as long as the sprouts. We will use the entire thing. Place the rinsed sprouts in a food processor or blender and process them finely.

image

Add the olive oil, salt and oats, stir in, then leave to sit for 10 minutes so the oats become well hydrated.

image

Add the flours, mixing until just blended, then let the dough sit for 10 minutes again.

image

Give the dough a quick and light air knead, just until it has warmed in your hands. Oil a bread tin (I used coconut oil, which worked well when time came to remove the loaf) and push the dough firmly but gently down into it. Let the loaf sit in a warm place for 3 hours or so. Don’t expect a huge rise, but there will be a small but perceptible rising.

image

Cook on as low a heat as you can. Either put it on top of a wood stove, or in a low temperature oven. Cook for a couple of hours (use your judgement here, it wants to be soft and elastic to the touch, but with a definite crust). This loaf was cooked in a gas oven at 120° C for 2 hours.  At this point, remove it from the tin, and bake for a further half hour to harden the rest of the crust. It is important to let this bread cool down before slicing. Slice when it is still just warm enough to slowly melt butter. The longer you leave it, the better it will hold together. My loaf crumbled a little on one side because there was a seam in the dough I didn’t work on. It was a time thing – I had other things that needed doing, so she went it “as is”. Ensure a good seamless dough however, and that should not be an issue.

*Sprouting the beans

Place the rinsed beans in a jar and soak for 8 hours. Drain them, then put them back in the jar. Cover the mouth of the jar with a cloth, then lie the jar on it’s side in a dark place. Every 8 - 12 hours, rinse the beans then return them. After a few days of sprouting, bring the jar out into the light and continue to sprout and rinse for a few days more until the roots have appeared, and are as long as the sprouts.

image


** slow fermented sourdough sponge

Take about a cup of bubbly sourdough starter, then add ½ cup of flour (whole spelt or rye, or buckwheat if you want a gluten free version) and some water. Mix until the consistency is very wet, but still like a very thick pancake batter. The bacteria in the starter will start to feed on the flour, and as long as they are kept fed, the sponge will remain sweet and bubbly. so we need to continuously feed this. In hot weather every 4 hours, in cold weather, you can get away with 8 or even 12 if more flour is added. To slow feeding add more water. Trial and error will tell you when the sponge needs feeding. Basically if it isn’t bubbling, it needs feeding. As the bacteria feeds, the sponge develops a real sourness, so when a finger is dipped in, and the sponge tasted, it is both sweet and sour. Lack of feeding will result in a third taste  - the acrid and bitter taste of dead bacteria. True sourdough bread is sweet and very sour, but never bitter.

image


Useful links

http://www.celestialroots.com/sourdough-starters.php

http://www.celestialroots.com/slow-fermented-sourdough.php

https://www.facebook.com/celestialroots

<3

Posted 561 weeks ago

Ginger Beer

image


Ginger bug and ginger beer


A ginger bug is a fermentation starter that uses yeast and lactic acid bacteria on the skin of organic ginger, and wild atmospheric yeast, ginger and raw sugar to make a brewing starter culture. It is as simple as this: in a jar combine 2 tbsp each of grated organic ginger, raw sugar, and pure water. Cover with a cloth, a loose lid, or close the lid, it doesn’t matter which. Every day, add 2 tbsp more of ginger, sugar, and water if it looks dry. Stir often during the day to encourage yeast colonisation and growth. Keep in a warm place, and within a few days, the mix should be bubbling with active yeasts. A pale sediment layer often forms on the bottom of the jar – this is normal, a combination of spent and active yeast cells.


Ginger beer

Ginger bug

Good palm sized piece of organic ginger (or more)

2 cups of raw sugar, or raw honey (honey ferments slower)

Juice of half a lemon, or grated rind of half an organic lemon (optional)

4 litres of water

Dice or grate the ginger root, and place it in 2 litres of water. Bring to a boil, then simmer gently for 20 minutes. Strain out the ginger, and pour the liquid into your fermenting vessel. Add the sugar and stir until dissolved, then top up with the additional water. If using raw honey, add the additional water first, and add the honey when the temperature is below 30° C. When the brew is at room temperature, stir in the ginger bug (and lemon if using) and stir vigorously. Stir often until the brew is bubbling away when you are not stirring it. When this occurs, bottle straight away for non-alcoholic ginger beer, or leave to ferment for longer for an alcoholic drink. Bottles should only be left out the fridge for a few days, as excessive carbonation can lead to explosions. If making a lot, bottle one in plastic so the bottle can be squeezed. When the sides no longer give with ease, transfer to cold storage. Drink quickly; fermentation is only slowed by refrigeration, not stopped. Try also half and half ginger/turmeric for a good, sharp tasting tonic, even add horseradish if you are adventurous.

The ginger beer shown above also has turmeric root and juniper berries. The one I have brewing now has ginger, turmeric, lemon myrtle and Australian native sarsaparilla.

https://www.facebook.com/celestialroots

http://www.celestialroots.com/

Posted 565 weeks ago

Feta - Easy Cheesey

image

This cheese has a great taste, texture and colour. This is as natural a recipe as I could work out, based on traditional and commercial Feta making techniques. For this cheese, use raw cow milk, but sheep or goat milk would work just as well. In using raw milk, the need to add calcium chloride is removed (its role is to repair the damage caused when milk is killed by pasteurisation). Whenever you see a cheese recipe that calls for calcium chloride, ignore this step if you are using raw milk. Likewise with the inoculation culture; a culture will either be mesophilic, or thermophilic. Where a thermophilic culture is called for, use kefir milk or whey; and where a mesophilic  culture is called for (as in Feta making), use cultured buttermilk. Specific cultures are useful to imitate a desired cheese, but there is also nothing wrong with creating our own local version of these cheeses, using the organisms native to milk, kefir, and our local environment.

2 litres of full cream raw milk

¼ cup cultured raw buttermilk*

¼ tsp liquid rennet dissolved in ¼ cup of pure water

2 tsp Himalayan salt

image

Bring milk to 30° C in a double boiler or similar arrangement. I used one large stock pot, with a slightly smaller one inside it, water in the outside pot, milk in the inside pot, so the milk is gently warmed by indirect heat. Once at 30° C, add the cultured buttermilk*, and maintain the temperature for 60 minutes. Add the diluted rennet, stir in well (but gently), then maintain the temperature for another 60 minutes.

image

Look for a clean break** between cheese and pot, and when this achieved, cut the curd into cubes of about 1.5 cm (a little over ½ an inch), angling the knife diagonally if the curd is deep, and adjusting the cube size upward to compensate for diagonal as well as vertical cutting. Don’t be too precise about it, the curds will knit back together again later, near enough is good enough here. Let the curds sit in the whey for 15 minutes, and then gently stir the mixture with a wooden spoon for 15 minutes, being careful not to break up the curds.

image

Put a piece of cheesecloth or loose weave muslin inside a colander or sieve sitting over a bowl. Pour the curds and whey into the cloth, and when most of the whey has drained through, gently gather the corners of the cloth and tie together so the curds are tight in a little parcel. Suspend the cheesecloth over a pot, and let drain for 6 hours, or overnight.

image

Untie the cloth, and take the cheese out of it. The curds will have all knitted back together during the draining process. Place the cheese on a board or plate and cut into 2.5 cm (1 inch) cubes. Salt the cubes with 2 tsp of mineral rich, good quality salt, and place in cool or cold storage for 3 days to mature.

image

Even though heating of the milk is involved here, the low temperatures involved still leave the milk raw, in that none of the natural, living properties are affected. Therefore, this qualifies as a raw cheese, and a raw food.

* cultured buttermilk – to culture buttermilk, shake, churn or process raw cream into butter, and place the buttermilk in a jar on the bench for 24-48 hours, dependant on temperature. Less when it’s hot, more when it’s cool. The buttermilk will lose its sweetness, and will become acidic and full of live cultures.

** clean break – the milk has separated into curd and whey, and the mass of milk solids very clearly and cleanly breaks away from the side (and bottom) of the pot. In a way, the curd appears to be floating in the whey, and a knife can be run along the outside of the pot without damaging the curd.

http://www.celestialroots.com/

https://www.facebook.com/celestialroots

Posted 565 weeks ago
Top « Previous Next »