Slow fermented whole spelt sourdough bread
Let me say right from the start that I am not a measuring kinda guy when it comes to my bread. I go on feel, so I’ll try to give an idea of feel as I go. We start our sourdough bread making with a starter culture. This may be purchased, received as a gift from a friend, or made from scratch. I recommend using kefir milk whey, or indeed, just whole kefir milk as a starter, but there are lots of ways (haha) to start a starter.
As a rule of thumb, 4 cups of flour plus our starter will make one loaf.

OK, let's get started, this could take a while
I make no claims for this bread, but will merely say that from my observations, and from my research, this method of bread making appears to reduce the gluten content in the final product substantially. My feeling is the gluten content becomes negligible, but not zero. I don't advise people with extreme gluten intolerance to try this bread, but if you want to reduce gluten in your diet, and miss bread, please give this a try.
Take ½-1 cup of active sourdough starter. Add ½ cup of water, ½ cup of wholemeal spelt flour, stir well, cover with muslin (or similar), and leave in a warmish place. This is the start of the creation of what is known in baking circles as “the sponge”. Normal baking procedure these days is to add all the flour and water to the starter in one go, and leave to ferment for 8 hours. This kind of sourdough is not really sour, because there is not enough time in 8 hours for the airborne bacteria to populate the sponge in sufficient numbers to truly work it, and create a true sourdough bread.
Feeding the sponge
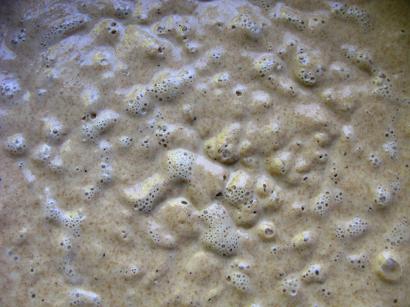
We need at least another 3 additions of ½ cup of flour to the sponge, adding water only when the mix seems too dry – we are not making bread soup! The timing of the feedings will be dependent on the ambient temperature, and the activity of the culture components. Fundamentally, when it stops bubbling, it is hungry and needs feeding. I would describe the texture of the healthy sponge as “luscious” as I stir it with a wooden spoon. This is a real pleasure for me, like stirring a cross between honey and velvet, and once the sponge and later, the reserved starter, become full of helpful bacteria, the sourness rises up and tickles my nose in the most delightful way. The feeding times may vary from 3 hours in warm weather with an active culture, to 8 hours in cooler weather with a sluggish culture. Always ensure the sponge has been fed before you go to bed, or before you go to work. A little more flour at bedtime won’t hurt if the sponge is active, that just means you will add less flour at the end. If I want two loaves, I’ll feed the sponge more often.
Top left: a healthy, bubbly sponge.
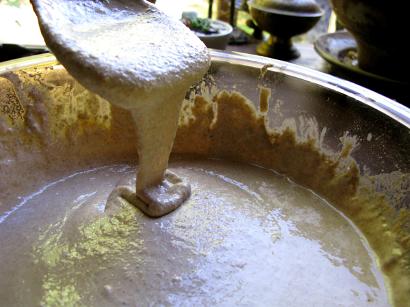
Bottom left: a good consistency for a recently fed sponge.
Making up the dough
Once we have a good, spongy sponge, that has been well fed over 1-3 days, remove ½ cup to replenish your starter. We then want to add some salt. Salt to taste really, but ¼ to ½ of a teaspoon is the amount to aim for per loaf. Salt works as a retardant to the fermentation process, and at this stage, that is what we want. A bit of fat is good too. Some prefer olive oil, others coconut oil, still others, butter - just make sure it’s a good, healthy fat source. I like to use beef fat, skimmed from the top of organic beef bone broth that has been slow cooked for a few days. I keep this in a glass jar in the fridge, it doesn’t go off. Mix the sponge, salt and fat well, then add the extra flour. 2 cups of flour will make 1 good sized loaf, add cold water as necessary, but we are looking for a consistency that is neither too wet, nor too dry - something that will stick to a bench or hand, but not very readily. Other flours can be incorporated at this stage, for example rye or buckwheat, chick pea or even fava bean. Fava bean flour is used by French bakers to provide the typical “baguette” taste, but is hard to get. Chick pea (gram, or besan) flour is a good substitute, but of course, not quite the same. No more than 5-10% wants to be fava or chickpea flour for my taste.
Kneading, aka, meditation time
The dough then wants kneading for 10 minutes or so, this can be on a floured bench or board, or in a large bowl. If kneading on a floured surface, be careful not to let the dough get too dry. The dough will warm under our touch, and we feel it become elastic, and notice that it begins to stick more readily to our hands and board/bowl. This is our sign that kneading is complete. Once kneaded, the dough can either be refrigerated immediately, or given a rise first. If refrigerating immediately, skip to next step. For a rise before refrigeration, cover the bowl, and leave for a couple of hours at least. After this, the dough will want a quick kneading. Don’t overwork it, or the structure will suffer.
Fermentation retardation, aka, refrigeration
Form the dough into a ball, and place in a bowl that contains it easily. Either cover the bowl with a tight fitting lid if you have such a bowl, cover with cling wrap, or simply cover it with wet muslin or cloth, and enclose in a plastic bag. Leave to refrigerate for a minimum of 24 hours, or for days. Fermentation will be retarded, eventually so much so that it serves no realistic purpose continuing refrigeration. At the normal 4-5 degrees C of the domestic fridge, five days would be a sensible upper limit. The warmest place in your fridge is what is best. Professional bakers have fridges set to a maximum of 15 deg C, and some bakers will slow ferment the bread for up to a month at these kind of temperatures. If the ambient temperature somewhere in your house sits above 5 degrees C, but below 15 degrees C with a little variation between the two, then try the slow ferment in the open. The dough will rise slowly in the cooler temperatures, but obviously the rate of rise will taper to virtually nil with time.
Baking
Remove the dough from the fridge, and let it come to a little below room temperature. Give it a final knead if you like, adding water or oil carefully if it has dried out in the fridge, and shape it into a compact loaf by hand. Place in a oiled loaf tin, or on a baking tray that is either oiled, or sprinkled with flour, polenta, or a mix of the two. Give the loaf a little time for a final rise at room temperature, covered with a wet cloth. 30 minutes to two hours is plenty, then put two longitudinal slits in the top, spritz with cold water and place in an oven preheated to 200 degrees C (190 fan forced). After 15-20 minutes, open the oven door, spritz the loaf again, and lower the heat to 170 degrees (160 fan forced) for 30-60 minutes (depending on size and density). At 30 minutes, open the oven door, and tip the loaf upside down on the tray (or slide out the tin). Rap the bottom with two finger tips – if it sounds hollow, like a drum, it is ready (or just rap the top for a tin). If not, give it more time. When ready; let it cool on a wire rack until it can be comfortably held in the hands before slicing.
The other baking option is this: form the dough into a ball and place it in an oiled bowl in the fridge. Cover with cloth and plastic bag, or with cling wrap/film. The idea here is not to give the bread any working whatsoever after fermentation retardation. Carefully lift it out of the bowl, place the ball on an oiled baking tray. give it a rise period for 30 minutes or so covered with a wet cloth, then place it in a cold over. Turn on the oven, and set the temperature to 180 degrees C. Check the bread at 40 minutes, then every 10 minutes until done. This bread will need to cool right down, so the centre is adequately cured, before you slice it. Place on a cooling rack for best results.
Experiment with your baking, the ideal will depend on the personal texture you get for your dough, your oven, your ingredients, etc. There are no rules, this is a hands on, organic process, and the only thing that matters is a good loaf of bread.
Be patient with this bread. It will take 2 or 3 goes before the starter really comes into its power.
To make a sourdough starter go to my sourdough starter page